
As those of you who pay attention on Twitter may have noted, I’ve been having some issues with the state of tanks in low-level instances in Fina Fantasy 14 lately. While I level my complaints directly at Riot Blade (and Gladiators in particular) that’s not really the core of the issue. MMOs are bad at teaching you how to play them, and for a role like a tank, that’s A Problem. Rather than continue to berate anonymous Gladiators for not knowing better, I’d just like to clear up a few things. While this post focuses on Gladiators/Paladins, some of it is also applicable to Marauders/Warriors as well. For a few reasons (*cough*) marauders tend not to have the same problems at low levels.
Maintaining Threat
While I’m not going to claim that it’s always easy (it’s not), tanking in FF14 isn’t terribly complicated. Your job in any given pull is to keep all of the enemies attacking you until all of them are dead, and also doing the best you can to keep yourself alive while doing this.The second part could be its own post, so I’ll stick to explaining the first. FF14, like many other MMOs at this point, uses a threat system (usually referred to in-game as “enmity”) to determine what enemies attack (most of the time). Tanks have abilities that are very good at generating threat, and using these liberally is one of the keys to being successful. To track you you’re doing, the party list and the enemy list both have different ways to display your current threat.
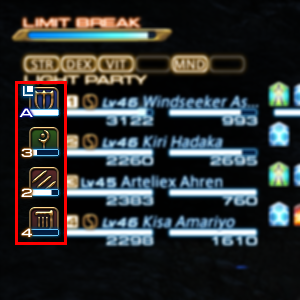
First, the enemy list tracks your threat status on all enemies, with green for low threat, yellow for medium, orange for high, flashing orange for a last chance warning, and red for when something has enough threat to attack you (aggro). (These are also all different shapes so they can be differentiated even with color blindness.) Tanks should strive to keep this as red as possible. The party list tracks who in your party has the most threat on your current target. Because the enemy list unfortunately doesn’t have a color for “about to lose aggro”, this is the only real way to see when someone else is getting dangerously high on threat. it can be helpful (especially if you have a Summoner or Black Mage in your party) to tab between enemies and see if any of them are doing unfortunate things.

Why Riot Blade is a Trap
For Gladiators, the abilities that do bonus threat are (in the order you get them) Savage Blade, Flash, Shield Lob, Rage of Halone, and Circle of Scorn. That last one only comes in at 50 and isn’t really relevant to this discussion. The problem lies between the levels of 12 and 26, where you have access to Riot Blade but not Rage of Halone. This means that for damage, the ideal combo is Fast Blade->Riot Blade, and out in the world this is perfectly fine. However, Riot Blade wasn’t on that list I mentioned earlier, so in dungeons you’ll lose threat to the classes that do more damage than you (which is to say all of them) if you use that combo exclusively. Fast Blade->Savage Blade amplifies the bonus threat on savage Blade, and keeps things where they should be: attacking you. Riot Blade does have a use, but I’ll get to that in a minute.
Provoke and You
Provoke is a Gladiator ability earned at Level 22, and currently holds the spot of “most required cross-class skill in the game” for Warriors. (If you are playing a Warrior and you do not have this skill cross-classed, get those extra few levels of Gladiator right now.) It’s the game’s only true taunt, so it’s essential for tank swaps, and it can be helpful when you lose aggro on a particular enemy. However, Provoke works by giving you threat equal to whoever the current highest threat person is, plus one point. This means that unless you immediately take some other threat-causing action, you’ll lose the target immediately. It also means that if you pull with provoke, you have exactly one point of threat and any action taken by anyone else will pull off of you. Shield Lob does have bonus threat attached, and should be used for pulling whenever possible.*
*There are edge cases where provoke’s longer range allows it to be useful for pulling, usually to grab a patrolling enemy.

Savior of the Universe
Flash is essential for Gladiator tanking. It does no damage, but a lot of threat to all enemies near you; I guess they don’t like light shining in their eyes or something. The range is just barely longer than melee range, so don’t use it expecting to hit enemies halfway across the room (and if you use it running in you’ll probably hit nothing). Flash is your only tool to build threat on multiple enemies simultaneously between when you get it at level 8 and when you get Circle of Scorn at level 50. Even if you use high-threat attacks on your primary target, not using Flash will result in everything else running to murder your healer as soon as they heal you once. Using it once is frequently not enough, either. How many times you should use it and how frequently varies depending on your personal gear, how many enemies there are, how long they’re likely to live, and if anyone in your party is using AOE attacks (attacks that hit multiple targets). Belghast’s recommendation from today’s post is generally a good one: Pull with Shield Lob, Flash twice once things are near you, and Savage Blade combo until dead.
Since Flash does eat a decent chunk of your MP bar, the only acceptable use of Riot Blade in dungeons is to earn back the MP to use Flash more. It can be useful, particularly if you have DPS that are level synced from 50, to tank by spamming just Flash until you are out of MP and using the Riot Blade combo only when you can’t use Flash.
Adventurer in Need
There are some additional nuances, but what’s here is enough to carry you through until you hit 50, provided you also remember not to stand in glowing red things. I hope this helps beginning Gladiators; If you are one of them and you’re in the low-level queue, I thank you for making the queue shorter for the rest of us.